u2192 Back to all English articles
u270fufe0f Originally published: 2021-08-15 / ud83dudd04 Rewritten: May 8, 2026
- 2026 DIY Dad’s Update: Partial Removal to Finish Coat u2014 6-Mat Japanese Room Ceiling
- When Partial Ceiling Removal Becomes Necessary
- How to Install a Patch Board
- Why Sealer Treatment Matters
- Tips for a Beautiful Finish Coat (Ceilings)
- For Anyone Considering Apartment Investment and Renovation
- Back to the Job Site u2014 First Finish Coat
2026 DIY Dad’s Update: Partial Removal to Finish Coat u2014 6-Mat Japanese Room Ceiling
ud83duded2 RECOMMENDED PRODUCTS
Fusuma Replacement Paper Kits
Fusuma renewal is the fastest Japanese-room refresh u2014 paper, paste, and 2 hours.
After finishing the 4.5-mat room’s ceiling, it was time for the 6-mat Japanese room (tatami room). This one required partial removal in some areas, making it a more involved job.
When Partial Ceiling Removal Becomes Necessary
ud83duded2 AVAILABLE ON AMAZON JAPAN
Tatami Repair Materials (Amazon Japan)
Fresh tatami edges signal a well-maintained property u2014 tenants feel it immediately.
In older apartments, partial removal is needed when:
- Water damage has caused rot or staining from roof or plumbing leaks
- Stains or mold have soaked deep into the boards
- Boards are warped or cracked, creating significant height differences
- Plaster-based material (fiber wall, gypsum) has crumbled
After removing the damaged section, a patch board (called a fusagi-ita) is installed before painting. Getting that patch board flush with the surrounding ceiling boards is the key to a clean final look.
How to Install a Patch Board
Steps for covering a removed area with new board:
- Measure the opening left by the removed boards precisely
- Choose board material that matches the thickness of the existing ceiling (4u20136mm plywood or ceiling board)
- Cut the patch slightly larger than the opening
- Screw into the existing ceiling joists (furring strips)
- Fill the seams with compound and sand flat
- Apply sealer, let dry, then paint
Careful compound work at the seams makes them nearly invisible once painted.
Why Sealer Treatment Matters
ud83duded2 RECOMMENDED PRODUCTS
Shoji Screen Paper & Repair Kits
Replace shoji paper every 3u20135 years u2014 it yellows faster than any other surface.
Sealer (primer/undercoat) is especially important for ceiling painting. Reasons:
- Prevents old wood from absorbing too much paint, which causes uneven coverage
- Seals in sap (resin) bleeding from the wood
- Stops existing stains and discoloration from bleeding through the topcoat (stain-blocking sealer)
- Improves paint adhesion
A sealer with sap-blocking and stain-blocking properties is particularly effective. Available at any home improvement store.
Tips for a Beautiful Finish Coat (Ceilings)
How to get a clean finish when painting a ceiling:
- Use a brush to carefully paint the edges (wall borders) first, then fill the center with a roller
- Move the roller in a “W” pattern for even coverage
- Let the first coat dry completely before applying the second (two coats is standard)
- Watch out for paint spatter when using a roller
Because you can’t look down at a ceiling, confirming the result is tricky. Holding a light source at an angle while looking across the surface makes it much easier to spot uneven coverage.
For Anyone Considering Apartment Investment and Renovation
Cost-effectiveness is everything in apartment renovation. DIY Dad keeps costs dramatically low by doing the work himself.
Marutoku Shop u2014 Renovation Materials & Lumber (Online) u00bb
![]()
Back to the Job Site u2014 First Finish Coat
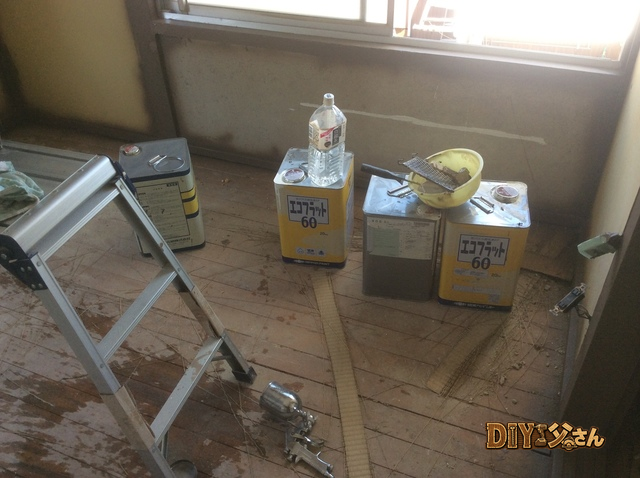
Hi there, DIY Dad here! On to the ceiling u2014 finish coat time. Last time I completed the sealer treatment. There were some gaps and unevenness that bothered me, but I decided to push forward rather than dwell on it. I applied the finish coat right over the top using Eco Flat 60.
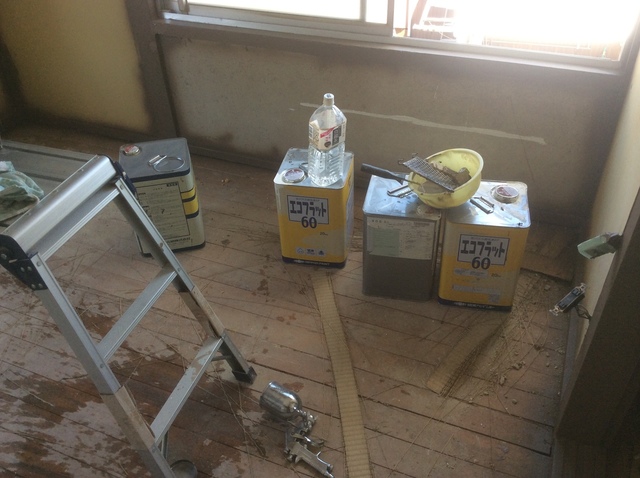
u2192 Eco Flat 60
For painting tools and materials, see DIY Dad’s Tool & Material Guide Vol.4 u2014 Paint Application.
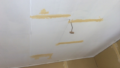
I applied the white topcoat, expecting the paint to smooth things out somewhat u2014 but the film was too thin. It hid absolutely nothing.
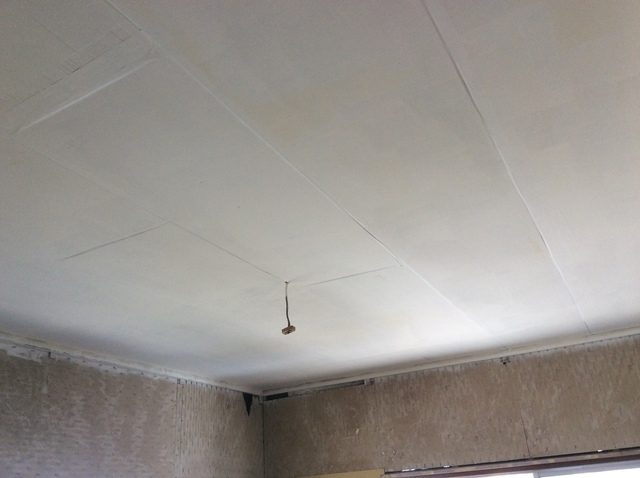
u2192 Surface unevenness visible after finish coat
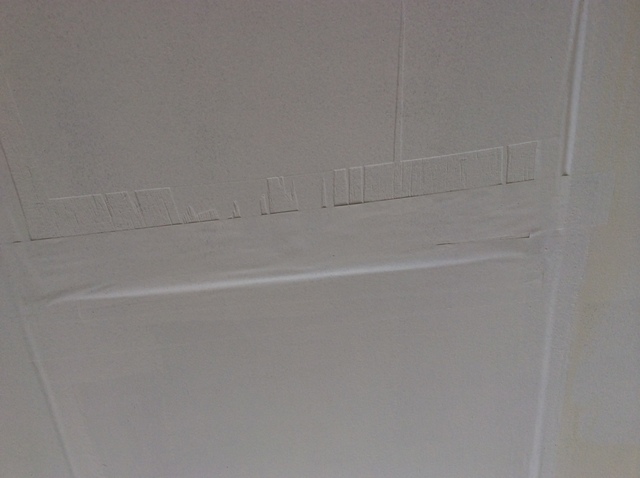
u2192 Surface unevenness visible after finish coat
The bumps around the patch boards are very noticeable u2014 it’s clear that paint alone won’t fill them. This needs a redo. It’s extra work, but next time I’ll apply compound to flatten the surface between the patch boards and the original ceiling.
That’s all for today u2014 see you next time!
DIY Renovation Quote Review Manual
How to read, compare, and negotiate contractor quotes. This manual saved me u00a5800,000 on a single renovation project.
ud83cudfe0 More from DIY Father
15 years of landlord experience u00b7 3 apartment buildings u00b7 DIY renovations that saved millions of yen. Browse all articles at diytosan.com