ud83dudcda Kitchen 2 Renovation Series u2014 7 of 45
u2190 Kitchen2 Vol.6: Ventilation Fan Disassembly u00b7 Series Index u00b7 Kitchen2 Vol.8: Ventilation Fan Cleaning Pt.2 u2192
u270fufe0f Originally published: 2016-12-25 / ud83dudd04 Updated: May 8, 2026
- u270fufe0f 2026 Update from DIY Dad: Ventilation Fan Cleaning and Gas Equipment Removal
- Gas Equipment Removal: Always Call a Professional
- Key Points for Disassembling the Ventilation Fan
- How to Clean Stubborn Grease from a Ventilation Fan
- Final Check and Functional Test
- As a Landlord: Ventilation Fan Condition Is the First Thing Tenants Check
- ud83cudf73 For Anyone Considering a Kitchen Renovation
- The Actual Cleaning Work u2014 Tackling the Damper
u270fufe0f 2026 Update from DIY Dad: Ventilation Fan Cleaning and Gas Equipment Removal
ud83duded2 RECOMMENDED PRODUCTS
Modern Kitchen Cabinet Handles
New handles cost u00a53,000u20138,000 and make a kitchen feel 10 years newer instantly.
The middle phase of the kitchen renovation. Gas equipment removal and ventilation fan disassembly and cleaning run back to back. DIY Dad leaves the gas work to the professionals and tackles the fan himself u2014 thoroughly. ^ ^
Gas Equipment Removal: Always Call a Professional
ud83duded2 RECOMMENDED PRODUCTS
Kitchen Faucets
A faucet upgrade is the single highest-impact kitchen DIY per yen spent.
Removing or relocating a gas range or gas piping requires a licensed gas fitter. DIY Dad called in contractors on two separate visits for this stage.
What to leave to professionals: all piping from the main gas shutoff forward, and disconnecting the gas range. Typical cost: u00a510,000u2013u00a530,000. Handing this off frees you up to tackle everything else with confidence. m(_ _)m
Key Points for Disassembling the Ventilation Fan
Disassembly procedure for a propeller-type kitchen ventilation fan:
- Step 1: Turn the circuit breaker OFF (non-negotiable!)
- Step 2: Remove the nut holding the propeller (may be reverse-threaded)
- Step 3: Pull the propeller out
- Step 4: Remove the cover and filter
- Step 5: Unscrew and remove the casing (4u20136 screws)
Important note: the propeller nut may be reverse-threaded u2014 meaning it loosens clockwise. If it seems impossibly tight, try the other direction. DIY Dad spent 30 minutes on this very issue. (lol) u0669( u141b )u0648
How to Clean Stubborn Grease from a Ventilation Fan
ud83duded2 RECOMMENDED PRODUCTS
Kitchen Backsplash Tile Kits
A tiled backsplash protects the wall and dramatically upgrades the kitchen appearance.
For years of built-up cooking grease, baking soda + hot water is the most effective solution.
DIY Dad’s cleaning recipe:
- Step 1: Fill a large bucket with water above 80u00b0C
- Step 2: Dissolve 3u20135 tablespoons of baking soda
- Step 3: Soak the fan parts for 30u201360 minutes
- Step 4: Scrub with an old toothbrush and sponge
- Step 5: Rinse thoroughly under running water
- Step 6: Allow to dry completely before reassembling
Commercial ventilation fan cleaning sprays also work, but baking soda wins on value u2014 about u00a5400 per kilogram and good for many sessions. ^ ^
Final Check and Functional Test
After cleaning, the parts must be completely dry before reassembly. Turning the breaker back on with moisture present risks a short circuit.
After reassembly, test all modes u2014 high, low, and off. Unusual noise suggests the propeller isn’t fully seated. Check the propeller nut. m(_ _)m
As a Landlord: Ventilation Fan Condition Is the First Thing Tenants Check
Female prospective tenants almost always check “kitchen cleanliness” and “ventilation fan condition” during a showing. A grease-caked fan dramatically lowers the overall impression of a property.
Conversely, a clean fan signals “this place is properly maintained.” DIY Dad cleans the fan after every tenant turnover, without fail. ^ ^
ud83cudf73 For Anyone Considering a Kitchen Renovation
The kitchen is the most challenging area in any renovation u2014 gas, electrical, and plumbing all converge here. DIY Dad’s rule: gas equipment is always handled by a professional. (lol)
Visiting a showroom to see products in person prevents unwanted surprises. Most are free to visit. ^ ^
![]()
Marutoku Shop u2014 Find wood and kitchen materials u00bb
The Actual Cleaning Work u2014 Tackling the Damper
Hi there u2014 DIY Dad here. ^ ^ Continuing with the 1F kitchen renovation. Next up: cleaning the ventilation fan. Tools used: scraper, sponge, neutral kitchen detergent, Kabikiller.
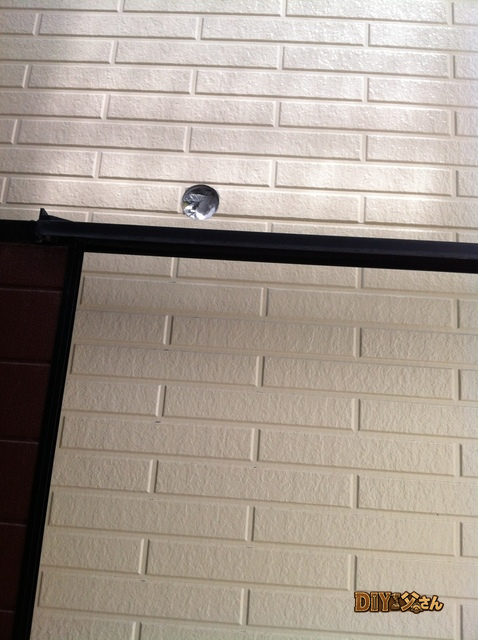
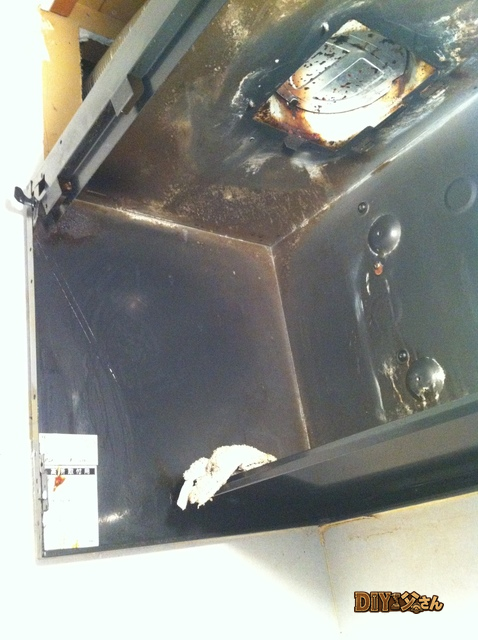
With the fan disassembled, you can see the exhaust duct where the fan used to sit. The duct inlet has a damper u2014 a flap that opens when air flows through.
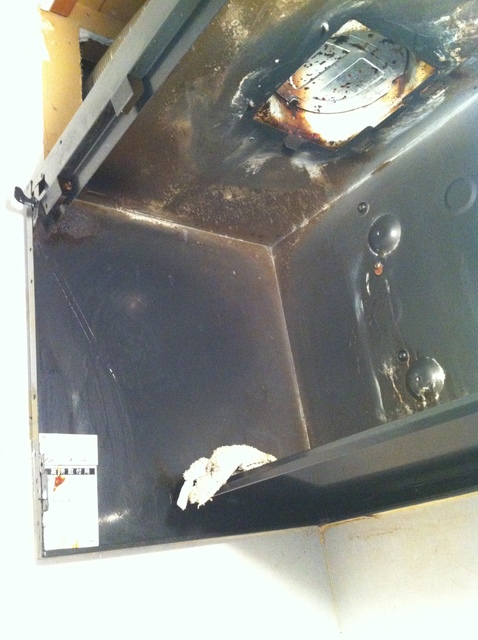
u2191 The fan housing viewed from an angle.
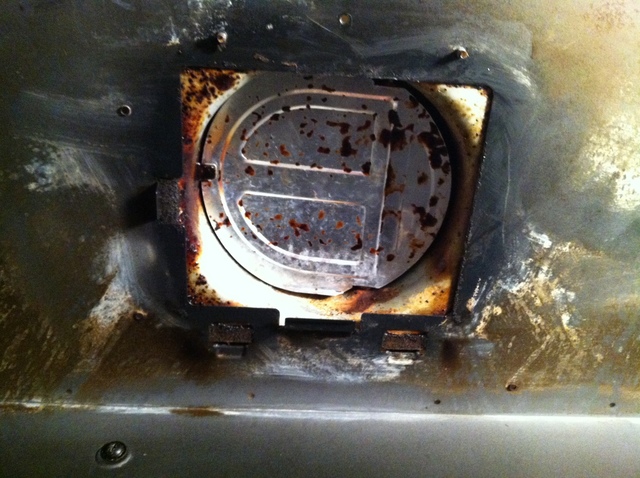
u2191 The damper flap in the exhaust duct.
In normal operation, airflow pushes this damper open. But right now it’s glued shut with solidified grease. Was it ever actually working? (u30fbu30fb?)
DIY Dad is not a fan of cleaning work u2014 no pun intended. But it has to be done. Reluctantly, here we go. uff3cuff3cu0669( ‘u03c9’ )u0648 //uff0fuff0f
Apply neutral kitchen detergent to the damper flap. Scrub with a sponge. Wipe with a towel. u03a3(-u1dc5_-u1dc4u0e51) Nothing. >_< Try scraping with the putty knife. The flap is thin aluminum sheet u2014 might deform easily. (uff1buff3fuff1b)
Apply a heavy coat of detergent. Let it soak for a bit. Scrub. A little improvement. (u30fbu2207u30fb) Keep the cycle going: apply detergent u2192 wait u2192 scrub u2192 repeat. ^^; This is a tough one!
The goal: remove enough grease that the damper flap can snap cleanly against its seat with a “clack” sound. Eventually u2014 success. The grease is out. ^ ^
That’s it for today! (^^)/~~~
ud83dudcda Kitchen 2 Renovation Series u2014 7 of 45
u2190 Kitchen2 Vol.6: Ventilation Fan Disassembly u00b7 Series Index u00b7 Kitchen2 Vol.8: Ventilation Fan Cleaning Pt.2 u2192
DIY Renovation Quote Review Manual
How to read, compare, and negotiate contractor quotes. This manual saved me u00a5800,000 on a single renovation project.
ud83cudfe0 More from DIY Father
15 years of landlord experience u00b7 3 apartment buildings u00b7 DIY renovations that saved millions of yen. Browse all articles at diytosan.com